Home Made Busking Amp
I play in Tin Taxi, an acoustic duo
We do some busking and also the occasional spot in various locations. This is a description of the amp I made.

|
| The original DA5 |
We had been using a VOX DA5 for busking. It wasn’t bad. It had a guitar input with tone control and lots of special effects which we didn’t use , a single mic input with a volume control and an aux input with no control at all. The sound was good, but it was not really ideal for an acoustic duo. But it had a nice enclosure and a nice speaker (Vox 10 Watt 8ohm) , so I used those.

|
| The Vox Box with original electronics removed, a re-inforcing piece added for mounting on a mic stand, and a separator for the new electronics |
The Power Amp

To get the power, I bought a Class D Amp. It is capable of providing 30 Watts (15+15) into 8 ohms with a 24V supply. The module is sold as PAM8620 although that is actually the ID of the chip. It is sold by lots of Chinese suppliers Although it is a stereo amp I only use one channel, and a 12V supply.
The amp is specified to drive to within a volt of the rails or which gives about 7.5 Watts into an 8 ohm speaker. It has a volume control and I found it could reach max power with only 0.7Vp-p at the input with the volume turned up full giving it a max gain of 40 (or 32dB).
Although the unit is classed as 15 + 15W, specmanship is at work here. The datasheet indicates that the maximum continuous output is 10W per channel at 24V but 15W at 12V. But at 12V, even if we drove to 1V from the rail, that is 11V peak or 7.8V rms or 7.6Winto 8 Ohms. It should theoretically give 15W into 4Ohms, but the data sheet says 8! Basically the datasheet is a mess.
The output is pulse width modulated at 300KHz and a brute to observe on an oscilloscope.

I used an 8 ohm load instead of the speaker to save my eardrums.

and with a filter across it I could see the waveform.

The preamp
I installed preamp in the busking amp (based on Rod Elliot’s simple mic amp) but it does not really get used now, as the mixer preamp gets connected straight into the power amp via a1/4" jack socket.
The Power Supply

I have tried a few different power supply solutions I currently use a Lucas 2.3AH 12V lead acid Battery which cost me £14.95 from ebay. My logic is:-

I have also used a 10 AA eneloop battery pack but they have to be taken out of the amp and out of the holder to recharge. My old 7day shop charger does 8 at a time,so it takes two goes. The charger also is a bit temperamental – I have had it over 15 years. Two battery packs are still available if necessary.
Using my best Panasonics I can get well over 1000mAh so these would manage 4 hours use.

I also have an 8 alkaline C cell battery pack and they should last a long time. But worry that they (or one of the eight fitted) will give up in the middle of a gig. Alkaline C cells are good for around 5000mAh, so that is 20 hours
The on/off led starts to dim and is off by the time the voltage drops to 9.9V. At this point, the lead acid and the rechargeables are almost completely flat, but the C Cells, with a more gradual discharge curve, are around half gone. They will supply power down to around 8 Volts. The idea is to use the lead acid for the main use and the rechargeables and C cells as a backup only.
I used 3 2.7V Zeners, (because that’s all I had) a yellow LED and a 470ohm resistor. I found the LED glowed with only 0.1mA through it so I had to shunt the LED with a resistor. Without the resistor the led would flow down to around 7 Volts. With the resistor it goes off at 10V.
Construction
I cut and bent a piece of aluminium to fit the top and rear aperture copying the DA5 amp measurements and hole spacing.

I then drilled the aluminium plate to take spire nuts as used by the DA5.
After fitting to the box and doing a quick test I found the aluminium buzzed like billy-O so i stuck some hardboard to the back using double side sponge tape.
The aluminium did not look “cool” so I covered it in black Gorilla tape.

|
| The completed amp. The power amp is on the right, the preamp on the left, the LED circuitry is on the terminal strip on the bottom. |

|
| Top view of the amp |
This shows Gain/Volume control on the top, with the power led and the external input below it.
The Hi/Lo Gain switch on the top and the 1/4″ jack and XLR inputs on the back and the three LEDs on the back are not used now
|
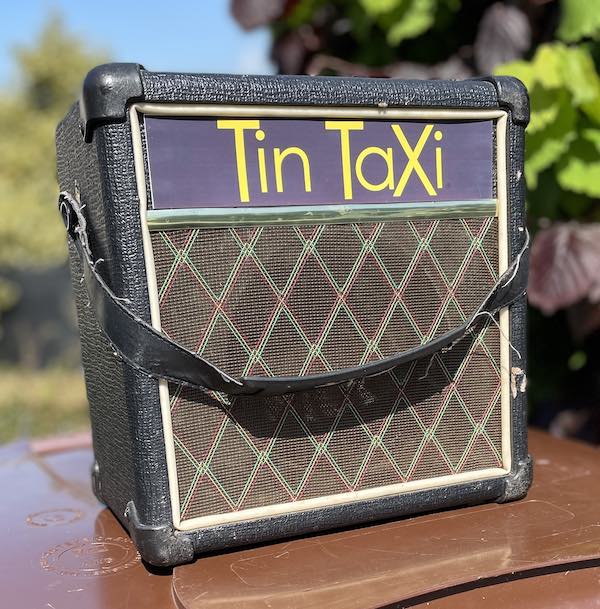
| The Tin Taxi Busking Amp. |
The result
Weight: 4.7Kg with the lead acid battery
Power: I can get 20V p-p into 8ohms before clipping sets in. That is 6.2W rms. The difference between that and the expected 22V peak may be due to lead resistance between the battery and the speaker plus the internal resistance of the battery.
It is worth remembering that the Beatles played with VOX AC30 amps which are 30 Watts. Now that is 6 times the power that my amp has (assuming the VOX rating is honest – it certainly wasn’t on my DA5!). On the power scale that is 8dB louder – it takes 10dB to sound twice as loud. So we can have a volume a bit over half what John or Paul had.
The original DA5 would not manage more then 3Watts without clipping on batteries, and clipping caused horrible distortion. On my amp distortion of the power amp hardly happens as the PAM 8620 reduces the gain.
Overall the amp is very simple to use and sounds very good.
Stands

|
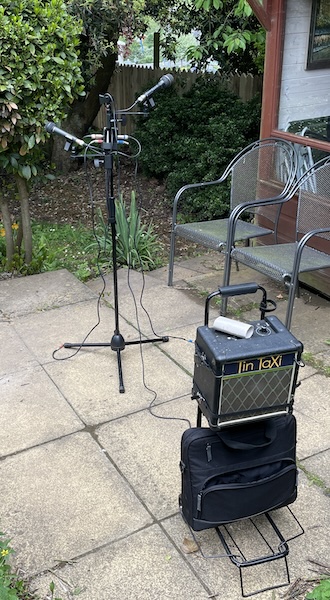
| The Busking amp mounted on a mic stand. |
We can operate with the amp on the ground, or we can put it mic stand.
I have found a trolley that also lifts the amp of the ground as well as carrying the mic stand and all the rest of the equipment apart from instruments.

|
| The amp on the little stand/trolley. |
The bag underneath carries cables and spares and the mic stand on the back is very quickly detached.

|
| Rear view showing mixer/preamp on stand. |
|
| The amp with the single stand and two mics |
The leads hanging down from the preamp are for instruments. The middle of the loo roll on top of the amp is for wrapping up the cables.
And Next?
The next mod will probably be a tone control circuit mounted in the amp somewhere.
Does it really need a tone control? It's not really for tweaking the sound, but more for reducing feedback. Rod Elliots tone control circuit from his high quality audio mixer (with an adjustable frequency for the mid range looks like it should do the job.
Electrically it will fit just before the input to the power amp. Physically?? TBD.
No comments:
Post a Comment